DIY Box Valences
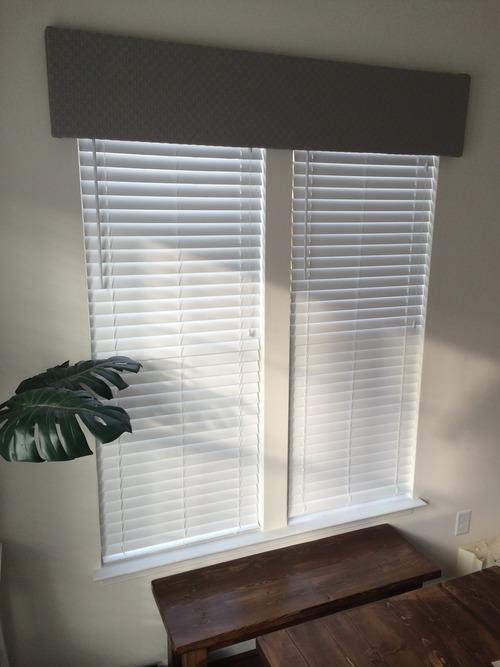
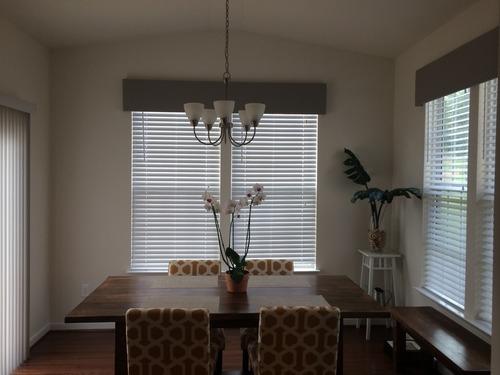
We wanted to add a decorative touch to our morning room windows by creating fabric covered boxed valences. We chose a fabric that could subtly complement the upholstered dining room chairs without being the main focus of the room.
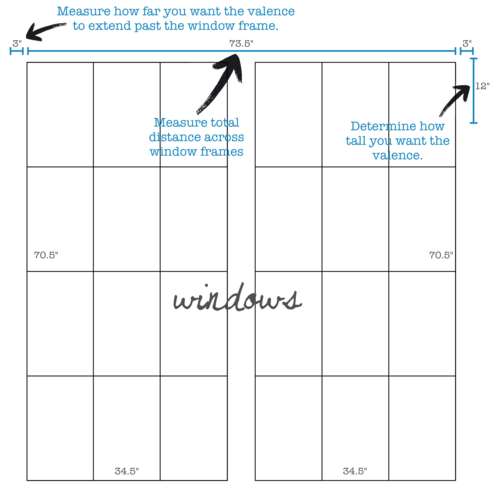
Measure the window.
- Determine how far you want the valence to extend beyond the window frame. I extended ours 3” on both sides.
- Determine how far you want the valence box to extend out from the wall. Since our windows are inset we only wanted the valence to extend 1.5”.
- Determine the height of the valence. This depends largely on personal preference. We decided on 12”.
Supplies
- Plywood 79.5”×12” (front panel)
- 79.5”×1.5” (top siding)
- 11”×1.5” (right siding)
- 11”×1.5” (left siding)
- Wood glue
- Staple gun
- Batting - I picked up whatever was on sale at Joann Fabric
- Fabric spray adhesive
- 2.25 yards of muslin (to line the fabric)
- 2.25 yards of fabric
- 3 - 1.5” L brackets and 4” screws
- Build the wooden frame. We used wood glue and clamps to assemble the valence and allowed it to dry overnight. Then used a few nails to secure the boards.
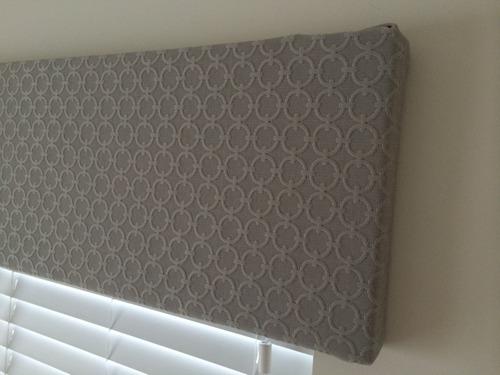
- Attach the batting with fabric adhesive. The batting gives the finished valence a more polished look and softer edges. Prepare the batting by cutting it slightly larger than the wooden frame so the excess can be folded over. Spray the front siding of the wooden frame with the fabric adhesive and lay the batting evenly over it.
- Line the fabric. Cut an 88.5”“×18” piece of muslin and fabric. With the front facing sides together I used a straight stitch to sew the pieces together leaving just enough of a gap to flip the fabric through. Once I turned the fabric right side out I did not worry about hand sewing the gap closed. At this stage, make sure the fabric and seams are ironed thoroughly.
-
Attach the fabric with a staple gun.
- If your fabric has a geometic pattern (like the fabric I used) then be extra careful to lay the fabric in a way that the pattern is straight. I found the easiest way to do this was to start with the bottom edge. Fold and staple the fabric over the wood. Note. Apply the staples evenly and liberally across the wood to prevent the fabric from bunching.
- Flip the valence over and make sure the fabric lays the way you want it to.
- Pull the fabric taut over the top wood panel and staple the fabric. Do the same thing for the sides.
-
Hang the valence.
- We used anchors to secure 3 x L brackets evenly spaced across the window frame.
- We briefly hung the valence on the brackets to mark the position where holes would need to be drilled. Note. The 1.5” L bracket has 2 top holes but we only marked 1 hole because it is over kill to use both holes.
- Once the holes were marked on the valence we used a ¼” drill bit to drill through the top wood.
- Use the 4” screw to secure the valence to the L bracket. We used 4” screws because it was very difficult to fasten a nut once the screw had been inserted into the L bracket. By using a longer screw we were confident the valence would stay put and not fall off.