
Nursery in Progress: Calvin and Hobbes Mural
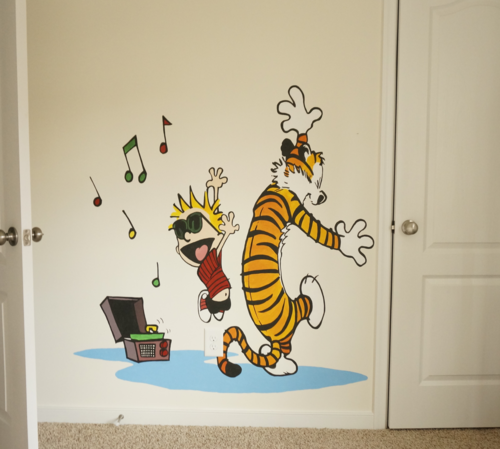
Aaron and I decided we wanted to paint a Calvin and Hobbes mural in our nursery. For Aaron, this was motivated by his (curiously) strong love for the comic strip, whereas I just thought it would look really cute. We chose an illustration from The Essential Calvin & Hobbes that felt fun and conveyed a carefree energy we hope our kid will embrace. Since Aaron and I collectively possess zero artistic ability, we posted an ad on Cragislist looking for a local artist to paint the mural. Among the many replies we received, one incredibly nice person (hi, Cat!) wrote to tell us she had recently painted her own Calvin and Hobbes mural and insisted we could do it ourselves, using a projector and some paint samples.
She attached a picture of her mural, which looked absolutely stunning, and claimed she also lacks any artistic ability, so we decided to give it a shot.
Of course we justified the decision by telling ourselves we could always prime over it and hire someone to redo it if it turned out terribly. In the end, we were extremely happy with how it turned out. This post outlines a non-artist’s steps to creating a mural for $33.06.
Materials
- Projector: borrowed from a friend (free)
- Scan of the original image (free)
- Paint: Home Depot BEHR Premium Plus Ultra, Flat/Matte paint samples ($2.94 each)
- Outline and other black areas: Black Suede (S-H-790)
- Hobbes’ orange: Amber Glow (280B-6)
- Calvin’s red shirt: Antique Red (S-H-190)
- Calvin’s yellow hair: Citrus Splash (S-G-370)
- Calvin’s skin: Clamshell (260E-2)
- Calvin’s green sunglasses: Formal Garden (450B-6)
- Blue puddle: Azurean (530B-5)
- Assorted medium gold taklon paint brushes ($12.48)
Total cost: $33.06
Steps
- Moved around the projector until the image was the right size and wasn’t skewed (watch out keystoning).
- Painted the lightest colors first and ended with the black outlining. I used a small round tipped brush to get cleaner lines around the edges.
- Calvin’s tongue: added a little white into the red paint and mixed thoroughly until the desired pink was achieved.
- Calvin’s sunglasses: we bought the wrong paint color for the green tint in the glasses but mixing in a little black helped darken it.
- Calvin’s hair: mixed in varying amounts of orange into the yellow paint for darker shading in certain areas.
- Hobbes’ orange: mixed in varying amounts of red and yellow into the orange paint for darker/lighter shading. I avoided over mixing to achieve a more textured/streaky appearance for the fur.
- Purple record player: Mixed in varying amount of red, blue, white and black to get the different shades of purple.
- Lastly, we painted the words “…Let’s go exploring!” on the back of the door because (at the risk of being cheezy) we hope our kid will always embrace life as one big adventure.
